
Learn how to effectively maintain electric brakes by understanding their components, inspecting wiring, testing controllers, checking magnets, and adjusting brake force.When towing a trailer, ensuring its electric brakes are functioning properly is essential for safe and efficient driving. Electric brakes provide enhanced stopping power and responsiveness compared to traditional systems, making them an excellent choice for heavier loads. However, regular maintenance and checks are vital to prevent malfunctions that could compromise safety on the road. In this blog post, we’ll guide you through the essential steps to check your trailer’s electric brakes, from understanding their mechanics to inspecting wiring, testing the brake controller, checking brake magnets, and adjusting the brake force as needed. By following these steps, you can ensure that your trailer’s braking system operates smoothly, giving you peace of mind on every journey. Let’s dive into each aspect of maintaining your trailer’s electric brakes.
Understanding Electric Brakes
Electric brakes are a vital component of many trailers, providing effective stopping power through an electric current rather than traditional hydraulic methods. Understanding how electric brakes work is essential for ensuring safety and performance while towing.
How Electric Brakes Work
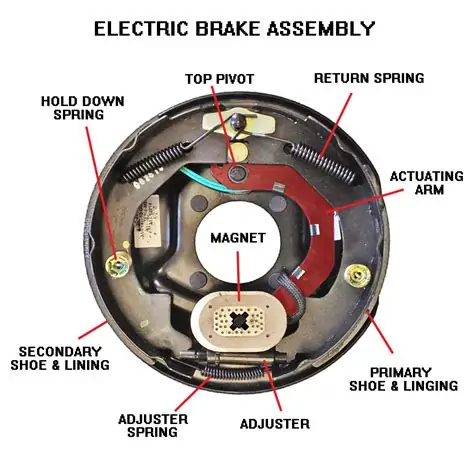
Electric brakes operate using a simple yet effective mechanism. They consist of a brake controller in the towing vehicle connected to the trailer’s braking system. Here’s a brief overview of how the system works:
- The brake controller is activated when the driver applies the brakes in the towing vehicle.
- This activation sends an electric current through the brake wiring to the trailer.
- The current engages the brake magnets mounted on the trailer’s axles.
- As the brake magnets are energized, they create friction against the brake drums, causing the trailer to slow down or stop.
Benefits of Electric Brakes
Choosing electric brakes for your trailer has numerous advantages:
- Better control: Electric brakes provide smoother and more consistent braking, which can enhance the overall handling of the trailer.
- Faster response time: Electric brakes engage more quickly since they are activated by the brake controller, improving safety.
- Ease of adjustment: These systems allow users to easily adjust the braking force according to their towing needs.
When to Check Electric Brakes
It’s essential to perform regular checks on your electric brakes to ensure they’re functioning correctly. Pay close attention to the following:
Inspect before any long trips, after trailer use, or if you notice unusual behavior while braking.
In summary, understanding how electric brakes work can help you maintain your trailer’s performance and safety. Regular inspection and maintenance are crucial to keeping this system in optimal condition.
Inspecting Brake Wiring
When it comes to maintaining your trailer’s electric brakes, one of the most crucial steps is inspecting brake wiring. Faulty wiring can lead to brake failure, posing serious safety risks. Follow these steps to ensure your electric brake wiring is in optimum condition.
1. Visual Inspection
Start with a thorough visual inspection of the wiring:
- Check for any visible damage, such as fraying, cuts, or abrasions.
- Ensure that all connectors are secure and free from corrosion.
- Look for signs of wear where the wiring may rub against metal edges.
2. Connection Points
Focus on the connection points:
- Make sure all ground connections are clean and tight. A loose ground can cause intermittent braking issues.
- Check the connections at the brake controller, ensuring that the harness is securely attached.
- Inspect the connectors leading to the brake assemblies for any signs of melting or overheating.
3. Use a Multimeter
To further assess the functionality of your brake wiring, utilize a multimeter:
- Set the multimeter to measure DC voltage.
- With the trailer hitched and the brake controller activated, measure the voltage at the brake magnets.
- A good reading should typically be around 12 volts. If the voltage is significantly lower, investigate the wiring further.
4. Check for Short Circuits
Perform a short circuit check:
- Turn off all electric systems connected to the trailer.
- Disconnect the battery or the main power source before inspection.
- Inspect the wiring for any signs of exposed wires that may indicate a short circuit.
5. Seek Professional Assistance
If you’re uncertain about your findings or lack the tools necessary for thorough inspection, don’t hesitate to seek professional assistance. A qualified technician can quickly diagnose and fix any issues with your electric brake wiring.
By conducting regular inspections of your brake wiring, you not only enhance the functionality of your electric brakes but also ensure a safer towing experience.
Testing Brake Controller
When it comes to electric brakes on trailers, ensuring that your brake controller is functioning correctly is crucial for safe towing. A faulty brake controller may result in poor braking performance, which can lead to hazardous situations on the road.
Steps to Test Your Brake Controller
- Prepare Your Trailer: Before starting, ensure that your trailer is connected to the towing vehicle and that the brakes are in good condition.
- Locate the Brake Controller: Typically, the brake controller is mounted near the driver’s seat, on the dashboard or center console. Familiarize yourself with the model you are using.
- Check Indicators: Most modern brake controllers come with indicator lights. Verify that the indicator lights are functioning; this usually means power is being sent to the brakes.
- Test the Manual Override: Most brake controllers feature a manual override switch. Activate the switch while the trailer is connected to test if the brakes engage. You should feel a resistance if the brakes are functioning correctly.
- Inspect the Wiring: Conduct a visual inspection of the wiring connected to the brake controller. Look for frayed wires, loose connections, or corrosion that could impair functionality.
- Check Voltage Output: Using a multimeter, check the voltage output from the brake controller. Connect the multimeter to the brake output terminal of the controller while towing. The voltage should read between 5 to 12 volts when applying the brakes.
- Road Test: After ensuring that everything is functioning correctly, undertake a short road test. Apply the brakes both lightly and hard to ensure they are engaging appropriately.
Common Issues
If you encounter issues during testing, consider these common problems:
- Improper Wiring: Double-check that all wire connections are secure and properly configured according to the brake controller’s manual.
- Faulty Controller: If the manual override and voltage readings indicate issues, the brake controller may require replacement or professional servicing.
- Contaminated Magnets: If the brake magnets on your trailer are contaminated or not aligned, they may not function effectively.
A well-functioning brake controller is as crucial as the brakes themselves. Always prioritize safety on the road.
– Trailer Safety Expert
By meticulously following these steps to test your brake controller, you can ensure that your electric brakes work efficiently. This will provide peace of mind and safety while you tow your trailer.
Checking Brake Magnets
When it comes to electric brakes on a trailer, ensuring that the brake magnets are in proper working condition is crucial for safe and effective braking. Here’s a guide on how to check the performance of your trailer’s brake magnets.
Step-by-Step Inspection
- Prepare Your Trailer: Park the trailer on a level surface and engage the parking brake. Ensure the trailer is connected to the towing vehicle.
- Visual Inspection:
- Check for signs of wear and tear on the brake magnets.
- Look for any debris or dirt that may affect the operation.
- Test the Magnets:
- Activate the trailer’s brakes by engaging the brake controller in the towing vehicle.
- Listen for a distinct humming sound, which indicates the magnets are engaged.
- Check Voltage: Use a multimeter to test the voltage supplied to the brake magnets. A reading of around 12 volts is typically required for optimal performance.
Understanding Magnet Functionality
The brake magnets function by creating friction against the drum whenever the brakes are engaged. Over time, these magnets can become worn down or lose their effectiveness. If you notice any issues during your inspection, it may be time to replace them.
Common Signs of Wear
- Uneven Wear: Check if one magnet is more worn than the others.
- Burnt Smell: A strong odor can indicate overheating, which may mean magnets need replacement.
- Loss of Braking Power: If you experience reduced braking effectiveness, inspect the magnets closely.
Final Notes
Regular checks and maintenance of your trailer’s brake magnets can significantly enhance safety on the road. Ensure you conduct these inspections as part of your trailer maintenance routine to avoid potential failures while towing.
Adjusting Brake Force
Properly adjusting the brake force on your trailer’s electric brakes is crucial for ensuring safe and effective braking performance. Here, we will cover the steps involved in making these adjustments to guarantee that your trailer performs optimally while on the road.
Tools Needed
- Ratchet wrench or socket set
- Adjustable screwdriver
- Digital multimeter (for testing)
Steps to Adjust Brake Force
- Check the Brake Controller – Before making any adjustments, ensure that the brake controller is correctly calibrated and functioning. It can have a significant impact on the amount of force applied by the brakes.
- Locate the Adjustment Mechanism – Identify the adjustment screw on the brake backing plate of each brake assembly. This is usually found near the top of the assembly.
- Make Adjustments – Using your adjustable screwdriver, turn the adjustment screw:
- Clockwise to increase the brake force.
- Counterclockwise to decrease the brake force.
- Test the Brake Response – After making adjustments, it’s vital to test the brakes. Take the trailer for a short drive, gradually applying the brakes to check for proper response. If the brakes feel too grabby or weak, return to the adjustment screw and make further refinements.
- Repeat as Necessary – You may need to repeat the adjustment process several times to achieve the ideal brake force for your specific load and driving conditions.
Tips for Effective Adjustment
Regular maintenance and periodic adjustments based on wear and load conditions can significantly improve the lifespan and performance of your trailer’s electric brakes.
By following these steps to adjust your brake force, you can enhance the safety and efficiency of your trailer while ensuring compliance with road safety standards.
Frequently Asked Questions
What are electric brakes on a trailer?
Electric brakes are a type of braking system that uses an electric actuator to apply braking force to the trailer wheels, allowing more control and improved stopping power.
How can I identify if my trailer has electric brakes?
You can identify electric brakes by checking for a brake controller in the tow vehicle and looking for wiring and connectors leading to the trailer’s brake assemblies.
What tools do I need to check electric brakes on my trailer?
You typically need a multimeter to test for electrical continuity, a socket set or wrenches for removal, and possibly a brake controller manual for specific diagnostics.
What are the signs that my trailer’s electric brakes need inspection?
Signs include uneven braking, squeaking or grinding noises, the trailer taking longer to stop, and the brake warning light on your vehicle’s dashboard.
How do I test the electric brakes on my trailer?
To test electric brakes, use a multimeter to check the voltage at the brake assembly while applying the brake controller. You should see a consistent voltage that corresponds to the controller’s settings.
What should I do if my electric brakes are not functioning properly?
If your electric brakes are not functioning properly, check the wiring for loose connections, inspect the brake controller settings, and consult a professional mechanic if needed.
How often should I check my electric brakes?
It’s recommended to check your electric brakes at least once a year or before a long trip, as well as during routine maintenance and inspections.