
Learn essential tips on brake pad maintenance, signs of wear, inspection tools, and how to interpret thickness for optimal vehicle safety.Maintaining your vehicle’s braking system is crucial for ensuring safety on the road, and one of the key components of this system is the brake pads. Regularly checking the thickness of your brake pads can help prevent dangerous situations caused by worn-out components. Fortunately, you don’t need to remove the wheels to conduct a quick inspection. In this blog post, we’ll discuss the importance of brake pad maintenance, identify the signs of worn brake pads, and outline the tools you’ll need for an effective inspection. We’ll also provide you with a step-by-step process to check brake pad thickness and guide you on interpreting your results. By the end, you’ll feel empowered to confidently assess your brake pads and keep your vehicle in optimal condition.
Importance of Brake Pad Maintenance
Regular brake pad maintenance is crucial for ensuring your vehicle’s safety and performance. Brake pads play a vital role in the braking system, converting the kinetic energy of your vehicle into heat through friction, which ultimately brings your vehicle to a stop. Neglecting their maintenance can lead to severe consequences.
Why Brake Pad Maintenance Matters:
- Safety: Worn brake pads can significantly reduce braking efficiency, leading to longer stopping distances and increased risk of accidents.
- Performance: Well-maintained brake pads provide consistent braking power, enhancing the overall driving experience.
- Cost-Effectiveness: Regular maintenance and timely replacement of brake pads can prevent costly damage to other components of the brake system, such as rotors.
- Extended Lifespan: Proper care can prolong the life of your brake pads, saving you money in the long run.
Signs that Brake Pad Maintenance is Needed:
If you hear squeaking or grinding noises when applying brakes, it may be time to check your brake pads.
Maintenance Tips:
1. Regular Inspections: Check your brake pads routinely for any signs of wear or damage.
2. Keep an Eye on Thickness: Monitoring the thickness of your brake pads can help you determine when to replace them.
3. Professional Check-ups: Consider getting your brake system checked by a professional during regular vehicle maintenance.
In conclusion, investing time in brake pad maintenance is not simply a recommendation but a necessity for safe driving and effective vehicle operation.
Signs of Worn Brake Pads
Maintaining your vehicle’s braking system is crucial for your safety on the road. Regularly checking for the worn brake pads is an essential part of vehicle maintenance. Here are some key signs that indicate your brake pads may be in need of replacement:
- Squeaking or squealing noise: This sound is often a built-in indicator that the brake pads are worn. Most brake pads have a metal wear indicator that produces a high-pitched noise when the pads are thin.
- Grinding noise: If you hear a grinding sound when applying the brakes, it typically means the brake pads are worn down completely and the metal backing is rubbing against the rotor.
This condition can cause significant damage to your braking system. - Vibration or pulsation: If you feel vibration in the brake pedal when you press it, this can signal uneven wear on the brake pads or other issues with the braking system.
- Brake warning light: In many modern vehicles, a dashboard warning light may indicate that your brake system requires attention. This light can indicate various issues, including worn brake pads.
- Reduced stopping power: If you notice that your vehicle takes longer to stop or the brakes feel less responsive, this could be a sign that your brake pads are worn and need to be replaced.
- Visual inspection: If you can see through the spokes of your wheels, you may be able to check the thickness of the brake pads visually. If they appear thin (less than a quarter-inch), it’s time for replacement.
Being aware of these signs of worn brake pads can help you maintain your vehicle’s safety. Regular checks can prevent more severe damage and ensure your braking system remains in top condition.
Tools Needed for Inspection
When it comes to checking brake pad thickness without removing the wheel, having the right tools is essential for efficiently and accurately performing the inspection. Below is a list of the necessary tools required for this process:
- Tape Measure or Ruler: A simple yet effective tool to measure the thickness of the brake pads. Make sure it has both metric and imperial units for versatility.
- Flashlight: A bright light will help you see the brake pads clearly through the wheel spokes, especially in low-light conditions.
- Brake Pad Gauge: This specialized tool provides precise measurements of brake pad thickness and may be more accurate than a standard ruler.
- Inspection Mirror: A small mirror can help you see hard-to-reach areas behind the wheel, allowing for a more thorough inspection.
- Camera or Smartphone: Taking pictures of the brake pads can be helpful for documentation and future reference.
- Wheel Wrench/Torque Wrench: While you don’t need to remove the wheel entirely for this inspection, a wheel wrench may be necessary to loosen lug nuts if you need better access later on.
With these tools, you will be well-equipped to check brake pad thickness without the hassle of removing the wheels, ensuring that your brake system remains safe and effective.
Step-by-Step Inspection Process
Inspecting your car’s brake pads is crucial for maintaining safety on the road. By utilizing the following step-by-step process, you can check your brake pads’ thickness without removing the wheels. This method helps ensure you’re aware of their condition and can address any issues promptly.
Step 1: Gather Your Tools
Before starting the inspection, make sure you have the following tools:
- Flashlight – To illuminate the brake area.
- Brake pad gauge or ruler – To measure the thickness of the brake pads.
- Inspection mirror – For better visibility of the brake components.
Step 2: Find a Safe Location
Park your vehicle on a level surface and engage the parking brake. Turn off your engine and ensure you have ample room to work safely.
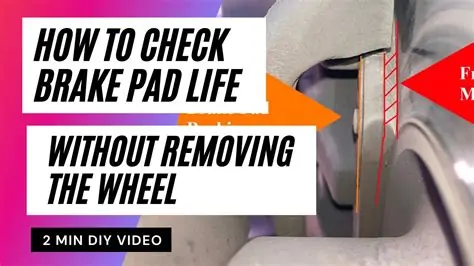
Step 3: Inspect Through the Wheel
Look through the wheel spokes to locate the brake caliper. Shine your flashlight at the brake pads, which are positioned alongside the rotor. You should be able to see the edge of the pads clearly.
Step 4: Measure the Thickness
Using a brake pad gauge or ruler, carefully measure the visible part of the brake pads. Make sure to note the thickness:
| Thickness (in mm) | Condition |
|---|---|
| 8-12 mm | Good – Pads are in excellent condition. |
| 4-8 mm | Warning – Pads are getting worn; consider inspection soon. |
| Less than 4 mm | Replace – Brake pads are worn out and need immediate replacement. |
Step 5: Use an Inspection Mirror
If the brake pads are not clearly visible, utilize the inspection mirror to get a better view. This can help you see any wear indicators or abnormalities on the pads themselves.
Step 6: Document the Condition
Take notes on the brake pad thickness and any visual signs of wear, such as cracks or uneven wear patterns. This documentation can be referenced during your next vehicle maintenance check.
Step 7: Repeat for All Wheels
Repeat the inspection process for each wheel to ensure that all brake pads are in acceptable condition. Consistency is key to maintaining brake performance.
By following this step-by-step inspection process, you can efficiently assess the condition of your brake pads without removing the wheels. Timely maintenance ensures both your safety and the longevity of your vehicle’s braking system.
Interpreting Brake Pad Thickness Results
When it comes to brake pad maintenance, understanding the thickness of your brake pads is crucial. Properly interpreting the thickness results allows you to determine whether your brake pads are still effective or need replacing. Here’s how to assess the results accurately:
Thickness Measurements
The thickness of brake pads can typically range from 8mm (new) to 3mm (worn). Here’s a simple breakdown:
| Thickness (mm) | Condition | Action Required |
|---|---|---|
| 8-10 | New or Good Condition | No Action Needed |
| 4-7 | Moderately Worn | Monitor Regularly |
| 3 or below | Worn Out | Replace Immediately |
Understanding Measurements
To accurately interpret the thickness of your brake pads:
- Use a caliper to measure the thickness of the brake pad. This tool gives you the most precise results.
- Compare your measurement with the baseline thickness values provided in the table above.
- Keep in mind that different vehicles may have different specifications, so always refer to your manufacturer’s guidelines.
Signs of Wearing
In addition to measuring the thickness, look out for these signs of worn brake pads:
– Squeaking or squealing noises when brakes are engaged.
– A grinding sound indicating that the pads are completely worn.
– Vibration or pulsation when braking.
Remember, regular checks will not only enhance your vehicle’s safety but also extend the life of your brake system. If you find any results that indicate your pads are worn, it’s essential to replace them promptly to ensure optimal vehicle performance.
Frequently Asked Questions
Why is it important to check brake pad thickness?
Checking brake pad thickness is crucial for ensuring safe braking performance. Worn brake pads can result in decreased stopping power and increased risk of accidents.
What tools do I need to check brake pad thickness without removing the wheel?
To check brake pad thickness without removing the wheel, you typically need a flashlight to see through the wheel spokes and a brake pad gauge for precise measurement, although a ruler can sometimes be an alternative.
How can I see the brake pads through the wheel?
You can see the brake pads through the wheel by looking through the spokes. Shine a flashlight to illuminate the area and examine the pads’ thickness against the rotor.
What thickness indicates that brake pads need to be replaced?
Most manufacturers recommend replacing brake pads when they are worn down to about 3 millimeters or less. However, checking your vehicle’s manual can provide specific guidelines.
Are there risks to driving with worn brake pads?
Yes, driving with worn brake pads can lead to longer stopping distances, potential brake failure, and damage to other braking components like rotors, leading to more costly repairs.
How frequently should I check my brake pads?
It’s advisable to check your brake pads at least once every oil change or every 5,000 to 7,500 miles, or sooner if you notice any signs of wear or hear unusual noises when braking.
Can I check brake pad thickness if my vehicle has alloy wheels?
Yes, you can still check the brake pad thickness with alloy wheels. The visibility might be better, and you may be able to see the pads more clearly compared to steel wheels, making it easier to assess their condition.