
Learn how to troubleshoot and replace your brake light switch with our step-by-step guide, ensuring safety and functionality in your vehicle.When it comes to vehicle maintenance, ensuring your brake light switch is functioning properly is essential not only for your safety but also for the safety of others on the road. A malfunctioning brake light switch can lead to issues such as non-functioning brake lights, potentially resulting in dangerous situations. In this blog post, we will guide you through the necessary steps to check your brake light switch, from locating the switch itself to testing its functionality with a multimeter. Whether you’re facing issues with your brake lights or are simply performing routine maintenance, our comprehensive approach will ensure you can diagnose and address any problems effectively. Let’s get started on keeping your brake lights shining brightly!
Locating the brake light switch
When it comes to maintaining your vehicle’s safety, ensuring the proper function of your brake lights is essential. One of the key components in this system is the brake light switch. Locating this switch is the first step in diagnosing any issues with your brake lights. Here’s a guide to help you find it.
The brake light switch is typically located near the brake pedal, but its exact position can vary based on the make and model of your vehicle. Follow these general steps to locate it:
- Access the driver’s side: Most time, you can find the switch inside your car, under the dashboard on the driver’s side.
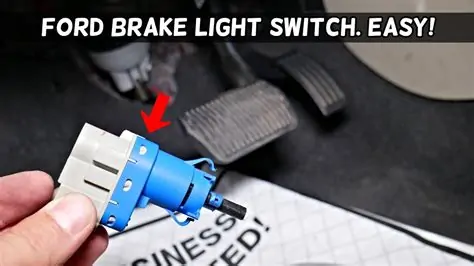
- Look for the brake pedal: Follow the brake pedal upwards to where it meets the firewall. The brake light switch is usually mounted on or near the pedal assembly.
- Identify the switch: The switch will generally be a small device with an electrical connector and may be held in place by a bracket or screws. It is designed to activate the brake lights when the pedal is pressed.
- Consult the owner’s manual: If you’re having trouble finding the switch, refer to your vehicle’s owner manual or a repair manual for specific instructions related to your model.
When you locate the brake light switch, it’s crucial to handle it carefully, as improper treatment may lead to further issues. Knowing its location makes it easier to perform subsequent checks or repairs, ensuring your vehicle remains safe on the road.
Ensuring power to the switch
To ensure proper functionality of your brake light switch, it is critical to confirm that power is reaching the switch. This involves a few straightforward steps that can help identify whether the switch is receiving power and functioning correctly.
- Locate the Wiring Harness: Begin by locating the wiring harness connected to the brake light switch, typically found near the top of the brake pedal.
- Inspect for Damage: Visually inspect the wiring and connectors for any signs of wear, fraying, or damage which may lead to power loss.
- Use a Multimeter: Set your multimeter to the “DC Voltage” setting. Connect the black probe to a good ground and the red probe to the power terminal of the brake light switch.
- Check Voltage: With the brake pedal not pressed, you should read 0 volts. When you press the brake pedal, the reading should change to around 12 volts or more, indicating power is being transmitted to the switch.
If you do not get a voltage reading while pressing the brake pedal, this indicates that the issue may not be with the brake light switch itself, but rather with the power supply or associated circuitry. Ensure all fuses associated with the brake light and switch are intact and functioning.
In case the switch has power but the lights still do not illuminate, it may have failed internally, and further testing is needed.
Remember, verifying the presence of electrical power is essential to diagnosing issues with the brake light switch effectively.
Checking for continuity
When diagnosing issues with your brake light switch, one of the essential steps is checking for continuity. This process ensures that the electrical circuit within the switch is functioning correctly, allowing the brake lights to operate as intended.
Here’s how you can effectively check for continuity in your brake light switch:
- Prepare Your Tools: You will need a multimeter or a continuity tester. Make sure these tools are in good working condition.
- Disconnect Power: Before testing, it is crucial to disconnect the battery to avoid any electrical shock or damage.
- Locate the Brake Light Switch: Find and remove the connector from the brake light switch. Identify the terminals of the switch.
- Set Your Multimeter: Turn your multimeter to the continuity setting (usually denoted by a sound wave symbol). This setting will beep or show a reading when there is continuity.
- Test the Switch: Touch one lead of the multimeter to one terminal of the switch and the other lead to the second terminal. If the multimeter beeps or shows a low resistance reading, then your brake light switch is functioning properly.
- Double-check if Necessary: If there is no beep or reading, the switch may be faulty. You can perform this test again to ensure consistency.
“Safety first! Always disconnect the battery before working on electrical components.”
By following these steps, you can effectively check for continuity in your brake light switch and determine if it’s working correctly.
Testing the switch with a multimeter
To ensure that your brake light switch is functioning properly, using a multimeter can be an effective method. This tool allows you to measure electrical values and confirm whether there is continuity in the switch. Follow these steps to test your brake light switch:
- Gather Your Tools: You will need a digital or analog multimeter, safety goggles, and possibly a wiring diagram for reference.
- Access the Brake Light Switch: Locate the brake light switch, usually found near the brake pedal. Remove any covering or panels that might obstruct your access.
- Disconnect the Switch: Carefully unplug the electrical connector from the brake light switch. This will prevent any false readings while you test.
- Set the Multimeter: Turn your multimeter to the resistance (ohms) setting. This setting will help you determine if there is continuity in the switch.
- Test for Continuity:
- Touch the multimeter probes to the terminals of the brake light switch.
- If the switch is closed (pressed), you should see a low reading (close to 0 ohms) indicating continuity.
- If the switch is open (not pressed), the reading should be infinite (or display as “OL” on digital multimeters).
- Interpret the Results:
- A consistent low reading when the switch is pressed indicates that the switch is in working order.
- A high or infinite reading suggests that the switch is faulty and may need to be replaced.
If your test indicates that the brake light switch is functioning properly, you can reconnect it and check the brake lights. If not, you might need to consider replacing the brake light switch for proper functionality.
Regular testing of your brake light switch can enhance your safety on the road. – Automotive Expert
Replacing the brake light switch
When your brake light switch is faulty, the lights might not function correctly, which can be a safety hazard. If you’ve determined that the brake light switch needs replacement, follow these steps to ensure a smooth and efficient process.
Tools and Materials Needed
- New brake light switch
- Screwdriver
- Socket set
- Wire stripper/crimper
- Multimeter (optional for testing)
Steps for Replacing the Brake Light Switch
- Locate the Switch: The brake light switch is usually located near the brake pedal. In most vehicles, it’s mounted on the bracket that supports the pedal.
- Disconnect the Battery: To avoid any electrical shorts or shocks, disconnect the negative terminal of the battery before proceeding.
- Remove the Old Switch: Depending on your vehicle, you might need to unscrew or unclip the switch. Carefully detach any wiring harness connected to the switch.
- Install the New Switch: Align the new brake light switch with the mounting bracket and ensure it locks into place. Reconnect the wiring harness that you previously detached.
- Reconnect the Battery: Once the new switch is securely installed, reconnect the negative terminal of the battery.
- Test the New Switch: Press on the brake pedal and check if the brake lights illuminate properly. You may also use a multimeter to measure continuity if you’re unsure about the switch’s operation.
“Safety first! Always ensure your brake lights are functioning properly to maintain visibility and safety on the road.”
Following these steps will help you successfully replace the brake light switch
Frequently Asked Questions
What is a brake light switch?
A brake light switch is an electrical switch that activates the brake lights when the brake pedal is pressed.
How can I tell if my brake light switch is faulty?
Signs of a faulty brake light switch include brake lights that do not illuminate when pressing the pedal or remain illuminated when the pedal is not being pressed.
What tools do I need to check the brake light switch?
To check the brake light switch, you’ll need a multimeter, a socket wrench set, and possibly a flathead screwdriver.
How do I access the brake light switch in my vehicle?
Typically, the brake light switch is located near the top of the brake pedal arm or pedal assembly, sometimes requiring you to remove covers or panels to access it.
What steps should I follow to test the brake light switch?
To test the brake light switch, disconnect the switch connector, set your multimeter to measure continuity, and check for continuity while pressing the brake pedal.
Can I replace a brake light switch myself?
Yes, replacing a brake light switch is generally a straightforward process that can be done with basic tools, but always consult your vehicle’s manual for specific instructions.
What other issues could cause brake lights to malfunction?
Besides a faulty brake light switch, issues could include blown fuses, burnt-out bulbs, wiring problems, or issues with the vehicle’s electrical system.