
Discover how to inspect brake pads visually, measure thickness, identify wear indicators, listen for sounds, and use a borescope for thorough evaluations.When it comes to vehicle maintenance, ensuring your brake pads are in good condition is crucial for safety and performance. However, many drivers may hesitate to remove their wheels for a thorough inspection. The good news is that you can check the condition of your brake pads without the hassle of wheel removal. In this post, we will explore various methods for assessing brake pad health, including visual inspections, measuring brake pad thickness, identifying wear indicator marks, and listening for any warning sounds. Additionally, we will discuss the innovative use of a borescope to get an insightful look at your brake pads. By following these techniques, you can maintain peace of mind regarding your vehicle’s braking system and enhance your overall driving safety.
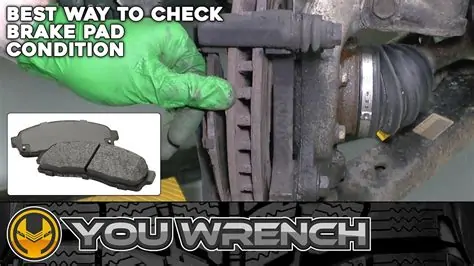
Visual inspection of brake pads
Conducting a visual inspection of brake pads is a crucial part of vehicle maintenance, allowing you to assess the condition of your braking system without the need for removing the wheels. Here’s how to effectively perform this inspection:
- Locate the Brake Caliper: First, identify the brake caliper, which houses the brake pads. This is generally noticeable through the wheel spokes.
- Examine the Brake Pad Surface: Look through the openings in the wheel rim to find the brake pads. You should be checking for the following:
- Thickness: Observing the thickness is essential. A healthy brake pad usually has at least 3 mm of material remaining.
- Cracks or Fraying: Look for any visible cracks or signs of wear on the pad surface.
- Contamination: Check for any oil or brake fluid spills that can impair the performance of the pads.
- Inspect for Wear Indicators: Many modern brake pads come with wear indicators, which can be spotted from the outside. These indicators will typically cause a squealing sound when it’s time for a replacement or show physical signs of wear.
- Look for Other Signs: Look out for any unusual debris near the brake pad surfaces, which could indicate a more serious issue within the braking system.
“Regularly checking your brake pads can prevent costly repairs and ensure your safety on the road.”
In addition to these steps, it is recommended to check your brake pads at least once every month, especially if you use your vehicle frequently or drive in tough conditions.
Measurement of brake pad thickness
One of the most crucial aspects of maintaining your vehicle’s braking system is ensuring that the brake pads are in good condition. This is particularly important for safety and performance. One effective way to assess the condition of brake pads without removing the wheels is through the measurement of brake pad thickness.
To measure the brake pad thickness, follow these steps:
- Gather Your Tools: You will need a caliper, a ruler, or a thickness gauge to measure the thickness of the brake pads.
- Visual Inspection: Before attempting to measure the thickness, visually inspect the brake pads through the wheel spokes. This can give you an initial idea of their condition.
- Accessing the Brake Pads: Some vehicles allow for easier access to the brake pads. Rotate the wheel until you have a clear view of the brake caliper and pads.
- Measure the Thickness: Use your tool to measure the thickness of the brake pads directly. The minimum thickness for most brake pads is typically around 3mm to 4mm. If you find that the thickness is below these levels, it may be time for a replacement.
Below is a simple table for reference on typical brake pad thicknesses:
| Condition | Brake Pad Thickness (mm) |
|---|---|
| New | 10-12mm |
| Satisfactory | 5-9mm |
| Replace Soon | 3-4mm |
| Replace Immediately | Less than 3mm |
Keep in mind that different vehicles may have specific recommendations regarding the thickness of brake pads. Always refer to your owner’s manual for guidance. Regular monitoring of brake pad thickness can help prevent more extensive repairs and ensure your vehicle remains safe to drive.
“Safety isn’t expensive, it’s priceless.”
By regularly checking the measurement of your brake pad thickness, you can take proactive measures to maintain your vehicle’s braking performance and ensure your safety on the road.
Looking for wear indicator marks
When it comes to ensuring your vehicle’s braking system is functioning properly, one of the simplest methods is checking for wear indicator marks on your brake pads. These marks are designed to alert you when the pads are reaching the end of their service life and require replacement.
Wear indicator marks are small grooves or notches that are typically embedded into the surface of the brake pads. They serve a crucial purpose: when the pads wear down to a certain point, the mark becomes visible, indicating that it’s time for a change. Here’s how you can check for these indicators without removing the wheels:
- Visual Inspection: Take a good look through the wheel spokes to see if you can spot the brake pads. Most modern vehicles have alloy wheels that offer a clear view of the brake components.
- Use Your Smartphone or Camera: If your view is obstructed, consider using a smartphone camera to take a picture of the brake assembly from different angles. This can help you see the wear indicator marks more clearly.
- Listen for Sounds: Pay attention to any unusual noises while driving, such as squeaking or grinding sounds, which can indicate that the brake pads are worn down and the indicators are activated.
Additionally, if you can partially see the edges of the brake pads, look closely for any signs of uneven wear. If one side is more worn than the other, it’s an indication that there might be an issue with the brake system, and the pads may need to be addressed even if the wear indicator marks aren’t yet visible.
Regularly checking for wear indicator marks is a smart practice that can save you from more extensive damage and higher repair costs in the future. Remember, maintaining your vehicle’s safety is paramount, and being proactive about brake inspections is part of that responsibility.
Listening for brake pad wear indicators
One of the most crucial aspects of maintaining your vehicle’s braking system is through listening for brake pad wear indicators. These indicators often provide a simple yet effective way to assess the condition of your brake pads without having to remove the wheels.
As brake pads wear down, many manufacturers include design features to help you easily identify when it’s time for a replacement. Here are some key points to consider when you’re listening for brake pad wear indicators:
- Squeaking Sounds: One of the most common indicators of worn brake pads is a high-pitched squeaking noise. This sound often emanates from a small metal shim embedded in the brake pad material. When the pads wear down to a certain thickness, this shim makes contact with the rotor, alerting the driver of the need for replacement.
- Squealing or Grinding: If you hear a continual squealing or a grinding noise, this may indicate that the brake pads are significantly worn, and the backing plate is now coming into contact with the rotor. This sound should prompt immediate inspection and possible replacement to avoid rotor damage.
- Chirping Sounds: Some vehicles may also have a built-in brake wear indicator that emits a chirping noise. If you hear this sound, it’s time to get your brake pads checked, as they are nearing the end of their useful life.
- Vibration or Pulsation: Although not directly a sound, if you feel vibrations or pulsation in the brake pedal while listening, it may suggest uneven wear or other issues. It’s essential to have this investigated to ensure your safety.
To effectively utilize your auditory senses in checking brake pads, consider the following tips:
- Ensure that your vehicle is in a quiet environment, as background noise can hinder your ability to hear wear indicators.
- Drive the vehicle at a slow speed and apply the brakes gently to listen for any abnormal sounds.
- Take note of any changes in sound during normal braking versus hard braking.
Incorporating this regular auditory inspection technique can help you catch potential issues early on, ultimately extending the life of your brake pads and maintaining the safety of your vehicle. Keeping an ear out for these sounds can save you both time and money in the long run!
Using a borescope for brake pad inspection
Inspecting brake pads without removing the wheels can be challenging, yet a borescope offers a practical solution for thorough evaluation. A borescope is a small, flexible camera that allows you to visually examine areas that might be hard to reach with traditional tools.
Here’s how you can effectively use a borescope for brake pad inspection:
Steps to Use a Borescope
- Prepare the Vehicle: Ensure the vehicle is parked on a flat surface with the parking brake engaged.
- Access the Wheel Well: Depending on your vehicle design, you may need to turn the wheel to gain better access to the brake assembly.
- Insert the Borescope: Carefully insert the borescope into the wheel well to get a view of the brake pads. Adjust it as necessary to capture clear images.
- Inspect for Wear: Look for signs of excessive wear, cracking, or other damage on the brake pads.
- Check Brake Rotor Condition: While inspecting, also take note of the brake rotor condition, ensuring no irregularities are present.
- Record Your Findings: Document any issues you observe for future reference or repairs.
Advantages of Using a Borescope
- Non-Invasive Inspection: You can inspect the brake pads without the need to remove the wheels, saving time and effort.
- Visual Documentation: Borescope images can be saved, allowing for accurate evaluation and comparison over time.
- Efficiency: Quickly identify issues that might require immediate attention.
In summary, utilizing a borescope for brake pad inspection is an effective method that provides a clear view of your brake system’s condition without the need for wheel removal. Regular checks using this technology can lead to safer driving and better maintenance of your vehicle.
Frequently Asked Questions
Why is it important to check brake pads regularly?
Regularly checking brake pads is crucial for ensuring safe braking performance, preventing brake failure, and extending the lifespan of braking components.
What are the signs of worn brake pads?
Signs of worn brake pads include squeaking or squealing noises when braking, a soft or spongy brake pedal, increased stopping distance, and a warning light on the dashboard.
Can I check brake pad thickness without removing the wheels?
Yes, you can often assess brake pad thickness by using a flashlight to look through the wheel spokes or by utilizing a brake pad thickness gauge.
What tools do I need to check brake pads without removing the wheels?
A flashlight, a small mirror or inspection camera, and a brake pad thickness gauge can be helpful for checking brake pads without removing the wheels.
How can I visually inspect brake pads through the wheel?
To visually inspect brake pads, peer through the wheel spokes with a flashlight to check the surface of the pads for wear, cracks, or uneven wear patterns.
Is it safe to drive with worn brake pads?
Driving with worn brake pads can be dangerous as it significantly reduces braking efficiency and increases the risk of accidents; it is advisable to replace them as soon as possible.
How often should I perform brake pad checks?
It is recommended to check brake pads at least once every six months or during routine vehicle maintenance, and more often if you notice any symptoms of wear.