
Learn the importance of brake fluid, how to locate and check the reservoir, inspect for contamination, and properly add or change fluid for safety.When it comes to vehicle maintenance, ensuring that your brake system is in optimal condition is crucial for safety on the road. One of the essential components of this system is the brake fluid, which plays a vital role in the effective functioning of your brakes. For Honda CR-V owners, understanding how to check and maintain brake fluid can help prevent costly repairs and ensure a smooth, safe driving experience. In this guide, we will walk you through the importance of brake fluid, how to locate your brake fluid reservoir, the steps to check the fluid level, inspect for any signs of contamination, and the process for adding or changing brake fluid. By following these simple steps, you can keep your Honda CR-V running safely and efficiently.
Importance of Brake Fluid
Brake fluid is a crucial component in the braking system of your vehicle, and understanding its importance can greatly enhance your safety on the road. This hydraulic fluid is responsible for transmitting force from the brake pedal to the brake components, allowing your vehicle to slow down or stop effectively.
Here are some key reasons why brake fluid is essential:
- Hydraulic System Operation: Brake fluid operates on the principle of hydraulics. When you press the brake pedal, the fluid transmits the pressure to the brake calipers, which then initiate the braking process.
- Temperature Resistance: Brake fluid is designed to withstand high temperatures generated during braking. This ensures consistent performance, preventing brake fade and maintaining stopping power.
- Corrosion Prevention: High-quality brake fluid contains additives that help protect the braking system from corrosion and moisture accumulation, prolonging the life of brake components.
- Safety Assurance: By regularly checking and maintaining the correct level of brake fluid, you can ensure that your brake system functions optimally, reducing the risk of brake failure.
Overall, the importance of brake fluid cannot be overstated. A well-maintained brake fluid system is vital for the safe operation of your Honda CR-V and any vehicle. Regular inspections and timely replacements will help you maintain the efficacy of your braking system and ensure a safer driving experience.
Locating the Brake Fluid Reservoir
Knowing how to locate the brake fluid reservoir in your Honda CR-V is essential for maintaining your vehicle’s braking system. The brake fluid reservoir is typically hidden under the hood, but with a little guidance, you can easily find it.
Here’s a step-by-step guide to help you locate the brake fluid reservoir:
- Open the Hood: Start by ensuring your vehicle is parked on a level surface. Pull the hood release lever inside your car and lift the hood, securing it with the prop rod if necessary.
- Locate the Brake Master Cylinder: The brake fluid reservoir is part of the brake master cylinder. Look for a cylindrical tank, usually made of plastic, which has a cap marked with either “brake fluid” or a funnel icon.
- Check for Accessibility: In most Honda CR-V models, the brake fluid reservoir is located near the back of the engine compartment, close to the driver’s side. Make sure there’s enough space around it for easy access.
Here’s a visual guide to help you understand its location:
| Component | Location |
|---|---|
| Brake Fluid Reservoir | Near the driver’s side, at the rear of the engine compartment |
Troubleshooting Tip: If you can’t find it right away, consult your owners manual. It typically includes a diagram identifying the brake fluid reservoir’s exact location.
Maintaining proper brake fluid levels is crucial for safe braking performance, so make sure you know where to check it!
Checking the Fluid Level
Checking the brake fluid level in your Honda CR-V is crucial for ensuring your vehicle’s safety and performance. Regular monitoring helps prevent issues that could lead to brake failure. Here’s how you can easily check your brake fluid level:
- Locate the Brake Fluid Reservoir: First, open the hood of your Honda CR-V and locate the brake fluid reservoir. It is usually a translucent container found near the back of the engine bay, close to the driver’s side.
- Inspect the Fluid Level: Look at the side of the reservoir where there are markings labeled ‘Low’ and ‘Full’. The fluid level should ideally be between these two marks. If the fluid level is below the ‘Low’ line, you will need to add more brake fluid.
- Check Fluid Color: In addition to the level, inspect the color of the brake fluid. Fresh brake fluid is typically clear or light amber. If it appears dark or cloudy, it may be contaminated and need changing.
Here’s a simple table to help you remember the signs you should look for:
| Fluid Level | Action Required |
|---|---|
| Between Full and Low | No action needed |
| Below Low | Add brake fluid |
| Dark or Cloudy | Change brake fluid |
By regularly checking the brake fluid level in your Honda CR-V, you can catch potential issues early and maintain optimal braking performance.
Inspecting for Contamination
Inspecting brake fluid for contamination is a crucial step in ensuring your Honda CR-V’s braking system functions properly and safely. Contaminated brake fluid can lead to corrosion, reduced braking efficiency, and ultimately, brake failure.
Here’s a guide on how to inspect your brake fluid for any signs of contamination:
What to Look For
- Color Change: Fresh brake fluid is typically clear or light amber. If the fluid looks dark or murky, it may be contaminated.
- Particles: Check for any visible particles or debris floating within the fluid. This can indicate dirt or corrosion within the braking system.
- Cloudiness: Brake fluid should not appear cloudy. Cloudiness can signal moisture absorption or the presence of contaminants.
- Odor: A burnt smell or any unusual odor can suggest that the fluid has degraded or is contaminated.
Steps to Inspect Brake Fluid
- Open the hood of your Honda CR-V and locate the brake fluid reservoir.
- Clean the reservoir cap area to prevent debris from entering the system when you open it.
- Remove the reservoir cap and take a look at the brake fluid inside.
- Use a clean white paper towel to soak up a small amount of fluid for visual inspection.
- Assess the fluid against the criteria mentioned above.
If you identify any signs of contamination, it’s important to take prompt action. Contaminated brake fluid should be replaced as it can significantly affect your vehicle’s performance and safety.
Regular inspection and maintenance of brake fluid not only enhance safety but also prolong the life of your braking system. – Automotive Maintenance Expert
Always consult your owner’s manual for specific recommendations about your Honda CR-V, and consider seeking assistance from a professional mechanic if you’re uncertain about the condition of your brake fluid.
Adding or Changing Brake Fluid
Maintaining your vehicle’s braking system is crucial for safety, and one of the key components is the brake fluid. Over time, brake fluid can become contaminated or degraded, necessitating its replacement. Here’s a step-by-step guide on how to add or change the brake fluid in your Honda CR-V.
Steps to Add or Change Brake Fluid
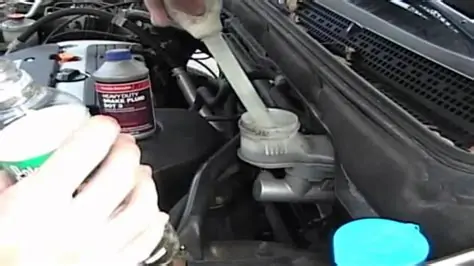
- Gather Necessary Supplies: You will need new brake fluid (consult your owner’s manual for the correct type), a clean funnel, and a rag for any spills.
- Locate the Brake Fluid Reservoir: Open the hood of your Honda CR-V and find the brake fluid reservoir. It is typically located near the back of the engine compartment and is marked with a brake symbol.
- Check the Existing Fluid Level: Look at the markings on the side of the reservoir to determine if the fluid level is below the minimum mark. If it is, you will need to add fluid.
- Inspect for Contamination: Before adding new fluid, check the existing fluid’s color and clarity. If it’s dark or has particles in it, a complete change is advisable.
- Add New Brake Fluid: Using a clean funnel, pour the new brake fluid into the reservoir until it reaches the maximum line. Be careful not to overfill it, as this can cause pressure buildup in the system.
- Check for Leaks: After adding the fluid, inspect around the reservoir and brake lines for any signs of leakage.
- Replace the Cap Securely: Once you’re done, be sure to securely fasten the reservoir cap to prevent contamination.
When to Change Brake Fluid
It’s generally recommended to change your brake fluid every 2 years or as directed in your Honda CR-V’s owner manual. Regular checks can prevent brake failure and ensure optimal performance.
“Safety is not an option; it’s a priority.” – Unknown
By following these steps, you can ensure that your brake system functions optimally and provides you with the safety you need while driving your Honda CR-V.
Frequently Asked Questions
Why is it important to check the brake fluid in a Honda CR-V?
Checking the brake fluid is crucial for maintaining the braking system’s efficiency and safety. Low or contaminated brake fluid can lead to brake failure, reducing stopping power.
How often should I check the brake fluid in my Honda CR-V?
It’s recommended to check the brake fluid at least once a month or during regular maintenance checks. However, if you notice any signs of brake issues, check it immediately.
What tools do I need to check the brake fluid in my Honda CR-V?
You will need a clean windshield washer fluid funnel and possibly a flashlight to see the fluid level clearly in the reservoir.
Where can I find the brake fluid reservoir in a Honda CR-V?
The brake fluid reservoir is typically located near the back of the engine bay, attached to the master cylinder, and is usually marked with a brake symbol.
What should I look for when checking the brake fluid level?
Look for the minimum and maximum lines on the reservoir. The fluid should be between these lines. Also, check for any signs of contamination, such as a dark color or particles.
What type of brake fluid is recommended for a Honda CR-V?
Most Honda CR-V models use DOT 3 or DOT 4 brake fluid. Always check your owner’s manual for the specific type recommended for your model and year.
What should I do if the brake fluid level is low?
If the brake fluid level is low, carefully add the appropriate type of brake fluid to the reservoir, but also investigate potential leaks or issues within the braking system.