
Learn about brake chambers, symptoms of back feeding, air leak checks, and how to test and inspect your brake system for optimal performance.When it comes to vehicle safety, the integrity of your braking system is paramount. One often-overlooked component is the brake chamber, which plays a critical role in transmitting air pressure to activate the brakes. A malfunctioning brake chamber can lead to dangerous back feeding, where air pressure does not function correctly, potentially compromising the effectiveness of your braking system. In this blog post, we’ll explore how to identify signs of back feeding, check for air leaks, and conduct thorough testing of the brake chamber. By understanding these key aspects, you can ensure your vehicle’s braking system operates safely and efficiently, helping you prevent accidents and maintain peace of mind on the road. Let’s delve into the essential steps for assessing and inspecting your brake system to keep your rides safe and sound.
Understanding Brake Chambers
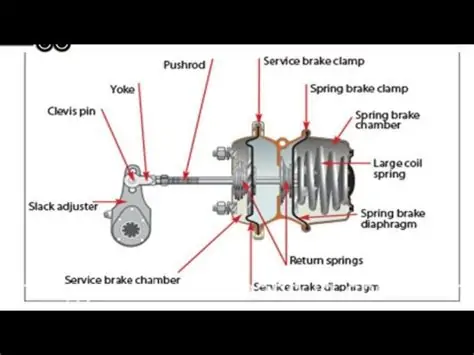
The brake chamber is a crucial component in air brake systems, commonly used in heavy vehicles such as trucks and buses. It converts compressed air into mechanical force, which operates the brakes when needed. Understanding how these chambers work is essential for effective maintenance and troubleshooting.
Brake chambers come in different sizes and configurations, but they fundamentally consist of the following parts:
- Diaphragm: This rubber component moves in response to air pressure changes, creating the force needed to apply the brakes.
- Spring: Powers the brake application when there is no compressed air present, providing a fail-safe mechanism.
- Push rod: Connects the diaphragm to the brake mechanism, transferring motion when the diaphragm moves.
There are two main types of brake chambers:
| Type | Description |
|---|---|
| Single Acting Brake Chamber | Uses air pressure to pull the diaphragm in one direction, typically used for spring brakes. |
| Double Acting Brake Chamber | Uses air pressure in both directions to provide stronger braking force, suitable for service brakes. |
It’s important to be aware of common issues that can affect brake chambers, such as:
- Air leaks due to worn seals or cracks in the chamber.
- Improper mounting, leading to misalignment and reduced performance.
- Corrosion or damage from environmental factors.
Regular inspection and maintenance of brake chambers contribute significantly to the overall safety and efficiency of your braking system. Stay tuned for more detailed information on related topics such as common back feeding symptoms and checking for air leaks.
Common Back Feeding Symptoms
When maintaining a vehicle’s brake system, it’s crucial to be aware of the common back feeding symptoms that may indicate potential issues within the brake chamber. Back feeding occurs when brake pressure is unintentionally allowed to flow back into the system, resulting in compromised braking performance. Here are some symptoms to look out for:
- Soft or Spongy Brake Pedal: If the brake pedal feels soft or spongy when pressed, it may be a sign that air is getting into the brake lines, often due to back feeding.
- Inconsistent Braking: Noticeable differences in braking power, where the vehicle does not respond evenly when the brake pedal is applied, could suggest that the brake chamber is not functioning properly.
- Brake Warning Light: If the brake warning light on your dashboard activates, it may indicate back feeding among other brake issues that require immediate attention.
- Hissing or Air Leak Sounds: Listening for hissing sounds when you apply the brakes can indicate air escaping from the system, which may be linked to back feeding.
- Uneven Brake Pad Wear: Inspecting the brake pads can reveal uneven wear patterns, potentially indicating hydraulic issues related to back feeding.
It’s important to address these symptoms promptly to maintain the integrity and safety of your vehicle’s brake system. A professional inspection can help diagnose and resolve back feeding problems effectively.
Checking for Air Leaks
One of the critical aspects of ensuring your brake system functions effectively is checking for air leaks. Air leaks in the brake system can lead to reduced efficiency and can even compromise safety. Here’s a detailed breakdown of how to check for these leaks:
Common Signs of Air Leaks
- Unresponsive brake pedal – If the brake pedal feels soft or unresponsive, it could be a sign of an air leak.
- Hissing noise – A noticeable hissing sound when the brakes are applied can indicate escaping air.
- Increased stopping distance – If your vehicle takes longer to stop, check for potential leaks.
Tools Needed
Before you begin, make sure you have the following tools:
- Brake fluid – For testing brake lines.
- Soapy water – This can help visually identify air leaks.
- Pressure gauge – To check the pressure levels in your air system.
Steps to Check for Air Leaks
- Visual Inspection: Start with a thorough visual inspection of the brake lines, connections, and the brake chambers. Look for any cracks, fraying, or signs of wear.
- Apply Soapy Water: Using a spray bottle filled with soapy water, spray the connections and hoses. If you see bubbles forming, this indicates a leak.
- Check Pressure Gauge: Use a pressure gauge to ensure that the system maintains proper pressure. A drop in pressure can indicate a leak.
Addressing Identified Leaks
If you do find air leaks during your inspection, it’s essential to address them promptly. Possible solutions may include:
- Replacing damaged hoses – Ensure all hoses are in good condition and replace any that show wear.
- Sealing connections – Use appropriate sealants for connections that may need tighter fittings.
- Consulting a professional – For complex issues, consider having your brake system inspected by a professional to ensure safety and efficiency.
Remember, maintaining your brake system is crucial for the safety of you and others on the road. Regularly checking for air leaks can help keep your vehicle in optimal condition.
Testing the Brake Chamber
Testing the brake chamber is a critical step in maintaining the safety and efficiency of a vehicle’s braking system. A faulty brake chamber can lead to severe malfunction, which could endanger both the driver and others on the road. Below, we outline key steps and methods for effectively testing the brake chamber.
Visual Inspection
Begin with a thorough visual inspection of the brake chamber. Look for:
- Cracks or deformations in the chamber casing
- Corrosion or signs of rust
- Loose or missing hardware
Pressure Test
A pressure test is essential to determine if the brake chamber is functioning properly. Follow these steps:
- Connect an air pressure gauge to the brake line.
- Apply air pressure while monitoring the gauge.
- If the pressure drops significantly, it indicates a possible leak or malfunction within the brake chamber.
Leak Test
Perform a leak test by applying soap solution to all connections. Look for:
- Bubbles forming, which indicate air escaping.
- Any hissing sounds when the system is pressurized.
Functional Test
To conduct a functional test of the brake chamber:
- Apply the brakes and hold them for a few moments.
- Release the brakes and listen for any unusual sounds, such as air hissing.
- If the brake chamber fails to release pressure or makes abnormal noises, further inspection is necessary.
Testing the Push Rod
Lastly, ensure the push rod operates smoothly:
- Check for any excessive wear or misalignment.
- Verify that it returns freely to its original position when the brakes are released.
By conducting these tests, you can ensure that your brake chamber remains in optimal working condition, reducing the risk of brake failure and enhancing overall vehicle safety.
Inspecting the Brake System
Inspecting your brake system is a crucial component of vehicle maintenance, ensuring safe and efficient operation. A well-maintained brake system not only enhances safety but also prolongs the lifespan of your vehicle’s components. Here are some essential steps and tips for a comprehensive brake system inspection:
1. Visual Inspection
Start with a visual inspection of the brake components. Look for signs of wear and tear, such as:
- Cracked or worn brake pads
- Leaking brake fluid
- Rust on brake components
- Frayed or damaged brake lines
2. Check the Brake Fluid
Ensure the brake fluid level is within the recommended range. Low fluid levels can indicate leaks or worn brake pads. If the fluid appears dark or contaminated, it may need to be replaced.
3. Inspect the Brake Pads and Rotors
Remove the wheel to access the brake pads and rotors. Check the thickness of the pads; if they are less than 1/4 inch thick, it’s time for a replacement. Ensure the rotors are smooth without deep grooves or scoring.
4. Examine the Brake Lines
Inspect the brake lines for any signs of damage or corrosion. Pay close attention to areas where the lines may rub against other components. Any leaks or cracks should be addressed immediately.
5. Test the Brake System
After performing the visual checks, it’s essential to test the brake system:
- Start the vehicle and press the brake pedal. It should feel firm and responsive.
- Drive at a low speed and test the brakes. They should engage smoothly without any grinding noises or pulling to one side.
6. Professional Inspection
If you notice any irregularities during your inspection or if you’re unsure about any aspect, consult a professional mechanic for a thorough evaluation. Regular inspections by a qualified technician can prevent significant issues and maintain overall vehicle safety.
Remember, maintaining your brake system is not just about functionality; it’s about your safety on the road. Regularly inspecting your brakes can help prevent costly repairs and ensure you drive with confidence.
Frequently Asked Questions
What is a brake chamber in a vehicle?
A brake chamber is a component of a vehicle’s air brake system that uses air pressure to apply force to the brakes, allowing the vehicle to slow down or stop.
What does it mean for a brake chamber to back feed?
Back feeding in a brake chamber refers to the situation where air pressure flows in reverse, potentially causing a malfunction in the braking system.
What are the symptoms of a back feeding brake chamber?
Symptoms of a back feeding brake chamber can include uneven braking, air leaks, or a hissing sound coming from the brake chamber.
How can I test if a brake chamber is back feeding?
You can test for back feeding by inspecting air connections for leaks, checking for air pressure drop when the brakes are not engaged, and ensuring that the pushrod is moving properly.
What tools do I need to check for back feeding in a brake chamber?
You typically need a pressure gauge, a wrench set, and potentially a stethoscope to listen for leaks while the braking system is under pressure.
Can back feeding lead to serious vehicle safety issues?
Yes, if a brake chamber is back feeding, it can lead to brake failure, reducing the overall safety of the vehicle and increasing the risk of accidents.
What should I do if I suspect a brake chamber is back feeding?
If you suspect a brake chamber is back feeding, you should have the system inspected by a qualified mechanic immediately to diagnose and repair any issues.