
Learn how to check and test your car’s brake lights effectively, ensuring safety with step-by-step guides on visual inspections and electrical testing.When it comes to vehicle safety, functioning brake lights are crucial. They play a vital role in communicating your intentions to other drivers, ensuring a safe driving experience for everyone on the road. But how do you know if your brake lights are working properly? In this blog post, we’ll walk you through essential steps to check your brake lights, from understanding their function to conducting various tests. Whether you’re performing a simple visual inspection, collaborating with a partner, or using a multimeter for more in-depth electrical testing, you’ll find easy-to-follow guidance. Maintaining the integrity of your brake lights not only enhances your safety but also contributes to responsible driving practices. Let’s dive in and make sure your brake lights shine bright!
Understanding the Function of Brake Lights
The brake lights of your vehicle play a crucial role in ensuring safety on the road. They are designed to signal to other drivers that you are slowing down or coming to a stop. Understanding their function can help you appreciate their importance and ensure they are working properly.
Brake lights serve several vital functions:
- Alerting Other Drivers: When you press the brake pedal, brake lights illuminate, alerting drivers behind you to your intention to stop or reduce speed. This communication is essential in preventing rear-end collisions.
- Indicating Vehicle Behavior: Some advanced brake lights may also incorporate features such as a third brake light or sequential lighting that offers visual cues about your vehicle’s movements.
- Legal Requirement: Most jurisdictions require that brake lights be functional to meet safety regulations. Non-working brake lights can result in fines and increase the risk of accidents.
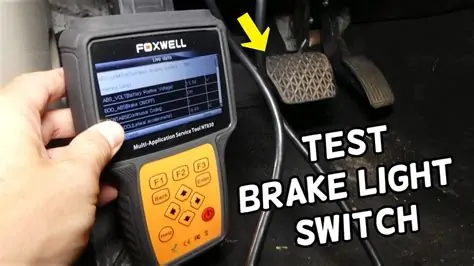
Understanding how brake lights function can help you identify potential issues early. For example, if your brake lights do not activate when you press the pedal, it could signal a problem with the brake light switch or the electrical system.
In summary, brake lights are a fundamental safety feature of your vehicle, functioning to communicate your actions to other road users effectively.
Visual Inspection of the Brake Lights
Conducting a visual inspection of your vehicle’s brake lights is a crucial step in ensuring your safety on the road. Regular checks can prevent potential issues and help maintain the functionality of your brake lights.
Follow these easy steps for an effective visual inspection:
- Check the Exterior: Begin by examining the lens covers of your brake lights. Make sure they are clean and free from dirt, grime, or any obstructions.
- Inspect for Cracks: Look for any cracks or damage in the brake light lenses. Damage can impact visibility and functionality, leading to safety hazards.
- Evaluate Bulb Condition: If possible, access the brake light bulbs. Check for any signs of burning or damage. A burnt-out bulb can easily be identified through visual inspection.
- Confirm Color: Ensure that the brake lights shine bright red. Any discoloration can impair visibility for other drivers.
- Test with Ignition On: With the ignition on, press the brake pedal and observe the lights. They should illuminate without any flickering or dimming. If they do, further investigation may be needed.
Moreover, performing a visual inspection should be a routine part of your vehicle maintenance. Dedicated checks can help minimize the chances of brake light failure when it matters the most.
Quotes:
Safety is not a gadget but a state of mind. – Eleanor Everet
By integrating these checks into your regular vehicle maintenance routine, you can ensure that your brake lights are functioning correctly and enhancing your overall safety on the road.
Activating the Brake Lights
To ensure that your vehicle’s brake lights are functioning properly, the first step is to activate them. This process is straightforward but essential for maintaining road safety. Below are the steps you should follow:
- Step 1: Make sure your car is in the park position or has the engine on.
- Step 2: Press down on the brake pedal with your foot. This action sends a signal to the brake light switch, activating the lights.
- Step 3: Check for any visible signs of the brake lights turning on; they should glow brightly at the back of your vehicle.
If you are checking this alone, it might be difficult to see the brake lights. Therefore, consider using a mirror or any reflective surface to verify if the lights are illuminated.
In some cars, the brake lights may only turn on when the brake pedal is engaged. However, in many modern vehicles, the lights also activate when the electrical systems recognize the brake engagement. Always make sure your lights are functioning correctly, as they are crucial for signaling to other drivers that you are stopping.
Remember, properly functioning brake lights are not just a legal requirement; they are a vital safety feature for you and others on the road!
Once you’ve confirmed that the brake lights activate correctly, you can move on to further checks such as visual inspections or testing with a partner.
Testing the Brake Lights with a Partner
Testing your car’s brake lights is an essential maintenance task that ensures your safety on the road, as well as the safety of other drivers. One efficient method to test your brake lights is by enlisting the help of a partner. Here’s how to go about it:
- Find a Suitable Location: Park your vehicle in a safe, well-lit area where you can easily observe the brake lights while they’re activated.
- Prepare Your Partner: Have your partner stand behind the vehicle where they can see the brake lights clearly.
- Access the Brake Pedal: Sit in the driver’s seat and make sure the engine is turned on for electrical power to reach the brake lights.
- Activate the Brake Lights: Press the brake pedal down firmly and ask your partner if they can see the lights illuminate.
- Check for Each Light: Verify that each individual brake light is functioning. If your vehicle has multiple brake lights, such as on either side of the rear, ensure they all light up.
- Inspect for Brightness: Ask your partner to confirm whether the lights are bright enough. This is important because dim lights may indicate a problem.
Here’s a quick summary of what to look for when testing:
| Brake Light Component | What to Look For |
|---|---|
| Left Brake Light | Should illuminate brightly when the pedal is pressed. |
| Right Brake Light | Should illuminate brightly when the pedal is pressed. |
| Center Brake Light | Should illuminate brightly when the pedal is pressed, especially on many modern cars. |
Once you’ve completed the test, discuss your findings with your partner. If any of the lights do not function correctly or you observe them being dim, address the issue promptly—whether it be replacing bulbs or checking for electrical problems. Regular checks of your brake lights not only confirm their function but help maintain your vehicle’s safety standard.
Using a Multimeter for Electrical Testing
When it comes to ensuring your vehicle’s brake lights are functioning properly, using a multimeter can be an effective method. This tool allows you to conduct precise electrical testing, helping identify any issues within the brake light circuit. Below, we detail the steps to check your brake lights using a multimeter.
What You’ll Need:
- Digital Multimeter
- Safety Gloves
- Owner’s Manual (for reference to wiring diagrams)
Steps to Test Brake Lights with a Multimeter:
- Prepare Your Vehicle: Ensure the vehicle is turned off. This will help prevent any electrical hazards.
- Locate the Brake Light Circuit: Refer to your owner’s manual to find the wiring diagram for the brake lights.
- Set Up Your Multimeter: Turn on the multimeter and set it to the DC Voltage settings. A typical setting is 20 volts.
- Check the Voltage:
- Disconnect the brake light socket from the wiring harness.
- Insert the multimeter probes into the socket (positive probe to the positive terminal and negative probe to the ground).
- Ask someone to press the brake pedal while you monitor the multimeter.
- Analyze the Readings: A functioning brake light circuit should read between 12 to 14 volts. If you receive a lower reading or no reading at all, there could be an issue with the wiring or the brake light switch.
- Inspect the Components: If your readings are off, further investigation may be needed. Check for:
- Damaged wiring
- Burnt-out bulbs
- Faulty brake light switch
By following the above steps, you can effectively use a multimeter for electrical testing of your brake lights. Regular maintenance ensures safety on the road and keeps other drivers informed of your actions.
Frequently Asked Questions
Why is it important to check if brake lights work?
Brake lights are crucial for safety as they signal to other drivers when you are slowing down or stopping, helping to prevent accidents.
What tools do I need to check my brake lights?
You typically only need a partner to help you check the lights or a reflective surface to see the brake lights when pressing the pedal.
How can I check my brake lights on my own?
You can use a smartphone camera to record yourself pressing the brake pedal, or you can back your car up to a reflective surface to see if the lights come on.
What should I do if my brake lights are not working?
First, check the brake light bulbs to see if they are burnt out; if they are fine, inspect the fuses and wiring, and if needed, consult a mechanic.
How often should I check my brake lights?
It’s a good practice to check your brake lights at least once a month, as well as before long trips.
Can a faulty brake light switch cause issues?
Yes, a faulty brake light switch can prevent the brake lights from functioning properly, and it may also affect cruise control or the transmission.
Are there any signs that indicate brake lights need to be checked?
Signs include other drivers signaling you that your brake lights are out, irregular functioning of the lights, or a warning light on your dashboard.