
Learn essential tips for inspecting brake pads, measuring thickness, checking wear indicators, and ensuring optimal brake performance with our comprehensive guide.When it comes to vehicle maintenance, ensuring your brakes are in top condition is paramount for safety on the road. While many may think that checking the brakes requires removing the wheels, there are several effective ways to assess brake health without the added hassle. In this blog post, we’ll guide you through simple yet crucial steps to check your brakes visually and physically. From inspecting the brake pads and measuring their thickness to looking for wear indicators and assessing the brake rotor for any signs of damage, these techniques provide essential insights into your braking system. Additionally, we’ll touch on how to test the responsiveness of your brake pedal. With these valuable tips, you can keep your brakes in check and ensure a safer driving experience without the extra effort of disassembling your wheels.
Visual inspection of brake pads
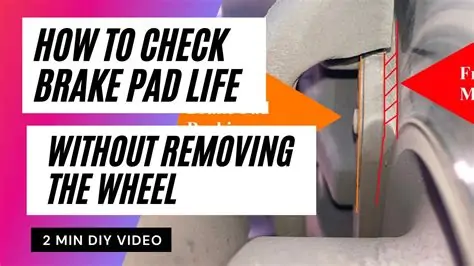
Checking the brakes of your vehicle is an essential part of ensuring your safety on the road. One of the easiest ways to assess the condition of your brakes is through a visual inspection of the brake pads. This method allows you to spot many potential issues without having to remove the wheel.
What to Look For
During a visual inspection, keep an eye out for the following signs:
- Thickness: Brake pads should be at least 1/4 inch thick. If they appear thinner than this, it’s time for a replacement.
- Cracks or Fraying: Look for any visible cracks, grooves, or frayed edges that indicate wear and tear.
- Surface Condition: The pad surface should be smooth. If you see uneven wear or scoring, it may affect braking efficiency.
- Fluid Leakage: Check for any signs of brake fluid leakage, which can compromise performance.
How to Perform the Inspection
- Park your vehicle on a level surface and engage the handbrake for safety.
- Using a flashlight, peer through the wheel spokes to get a clear view of the brake pads.
- Inspect both the inner and outer pads for the signs mentioned above.
When to Get Help
If you notice any worn, cracked, or damaged brake pads, it’s prudent to seek professional assistance immediately. Ignoring these signs can lead to decreased braking power and can potentially jeopardize your safety.
A regular visual inspection of your brake pads is a simple yet effective means of maintaining your vehicle and ensuring safety on the road. Always be proactive rather than reactive when it comes to brake maintenance!
Measuring brake pad thickness
Measuring the thickness of your brake pads is an essential part of maintaining your vehicle’s braking system. Even without removing the wheel, you can assess whether your brake pads need replacement. Here’s a step-by-step guide on how to do it:
- Gather Your Tools: You will need a flashlight to illuminate the brakes and a caliper gauge or a ruler to measure the brake pad thickness.
- Locate the Brake Pad: From the front or side of the vehicle, shine your flashlight into the wheel spokes. Look for the brake caliper and the brake pads attached to the rotor.
- Assess Visibility: Depending on your vehicle’s design, you may have a clear view or a limited angle of the brake pads. Make sure the view is unobstructed, allowing you to see the outer brake pad easily.
- Measure With Precision: Use your caliper gauge or ruler to measure the thickness of the visible portion of the brake pad. If you have a caliper gauge, place it against the pad to get an accurate reading.
- Understand the Optimal Thickness: Generally, a brake pad thickness of less than 3 mm indicates that it should be replaced soon. Brake pads usually start at 10-12 mm when new.
Here’s a quick reference table for thickness standards:
| Brake Pad Thickness (mm) | Status |
|---|---|
| 10-12 | New |
| 5-9 | Worn but usable |
| 3-4 | Consider replacing |
| Less than 3 | Replace immediately |
By following these steps, you’ll be able to measure brake pad thickness effectively without the need to remove the wheel. Regular checks can help ensure your vehicle remains safe and responsive on the road.
Checking for wear indicators
When it comes to maintaining your vehicle, ensuring the brakes are in optimal condition is paramount for safety. One of the key aspects of brake maintenance is checking for wear indicators. These indicators can provide vital information about the state of your brake pads without the need to remove the wheel.
What Are Wear Indicators?
Wear indicators are typically small metal tabs or grooves that are integrated into brake pads. Their primary function is to alert you when the pads are nearing the end of their useful life.
How to Check Wear Indicators
- Locate the Inspection Hole: Some vehicles have a transparent inspection hole on the brake caliper. If available, you can easily see the wear indicators through this opening.
- Visual Inspection: Use a flashlight to get a better view of the brake pads without removing the wheel. Look for the wear indicators that are usually positioned at the top or side of the pads.
- Listen for Sounds: While driving, be attentive to any screeching or grinding noises, which can also indicate that the wear indicators are making contact with the rotor.
- Check for Depth: If your pads have grooves or slots that wear down, you can visually assess if they are becoming shallow. A significant reduction in depth indicates that it’s time for a replacement.
Why Are Wear Indicators Important?
Checking for wear indicators is a crucial part of brake maintenance because:
- It helps you identify when to replace your brake pads before they become ineffective.
- It can prevent potential damage to brake rotors, saving you money on repairs.
- It enhances safety by ensuring that your vehicle has adequate stopping power.
Regular inspections and attention to wear indicators can significantly extend the life of your brake system and ensure safe driving. – Automotive Maintenance Expert
By regularly checking for wear indicators, you contribute to a safer driving experience and enhance the longevity of your vehicle’s braking system.
Inspecting brake rotor for damage
Inspecting the brake rotor for damage is a crucial step in ensuring your vehicle’s braking system is functioning properly. The brake rotors play a vital role in the vehicle’s stopping power, and any damage can affect braking performance. Below are some essential steps and indicators to look for during your inspection:
1. Look for Surface Cracks
Carefully examine the surface of the brake rotor for any signs of cracking. Cracks can appear due to heat stress or wear over time. If you notice any cracks, it is important to replace the rotor before further damage occurs.
2. Check for Warping
Warped rotors can lead to uneven braking and can be felt as a pulsation in the brake pedal. To check for warping:
- Look for any visible distortion on the rotor surface.
- Gently spin the rotor while observing for any noticeable wobbling.
3. Examine Rotor Thickness
Measuring the rotor thickness helps to determine if it is within the manufacturer’s specified limits. Using a caliper, take a measurement at several points on the rotor surface. If the thickness is below the minimum specification, the rotor should be replaced.
4. Look for Scoring and Grooves
Visible deep grooves or scoring on the rotor surface can indicate that the brake pads have worn down and are damaging the rotor. These grooves can affect braking performance and should be addressed. If severe, you may need to either machine or replace the rotor.
5. Inspect for Rust or Corrosion
Rust or corrosion can build up on the rotors, especially if the vehicle is exposed to moisture or road salt. Though surface rust can sometimes be cleaned off, significant corrosion may require replacement of the rotor.
By following these inspection steps, you can effectively identify any potential damage to your brake rotors without needing to remove the wheel. Regular inspections can help prevent serious issues down the line and ensure that your vehicle remains safe on the road.
Testing brake pedal responsiveness
Testing the brake pedal responsiveness is crucial for ensuring the safety and reliability of your vehicle’s braking system. A responsive brake pedal indicates that your brakes are functioning correctly, while a soft or unresponsive pedal may be a sign of issues that need attention. Below are the steps you can follow to effectively test the responsiveness of your brake pedal without removing the wheel.
- Start the Vehicle: Begin by starting the engine of your vehicle. This ensures that the brake booster, if equipped, is operational.
- Press the Brake Pedal: Slowly apply pressure to the brake pedal. It should feel firm and require moderate force to engage.
- Check for Sponginess: If the pedal feels spongy or sinks to the floor without much resistance, this could indicate air in the brake lines or a potential fluid leak.
- Test With Engine Off: With the engine off, press the brake pedal several times. The pedal should feel firm initially but may gradually sink with continuous pressure if there’s a leak in the system.
- Listen for Unusual Sounds: While pressing the brake pedal, listen for any strange noises, such as hissing, which could indicate a vacuum leak in the brake booster.
- Release and Reapply: Release the brake pedal and then quickly reapply it. It should return to the top position without sticking. If it doesn’t, there may be an issue with the brake system.
By following these simple steps, you can effectively evaluate the responsiveness of your brake pedal without needing to remove the wheel, helping you maintain your vehicle’s safety on the road.
Regularly assessing your brake pedal responsiveness can save you from potential safety issues and costly repairs. – Automotive Expert
Frequently Asked Questions
Why is it important to check brakes regularly?
Regularly checking brakes ensures they are functioning correctly, which is vital for safety and performance on the road.
What tools do I need to check brakes without removing the wheel?
You typically only need a flashlight to inspect the brake components through the wheel spokes.
What should I look for when inspecting brakes through the wheel?
Look for signs of wear, such as the thickness of the brake pads, any cracks on the rotors, and if there is any unusual noise during the braking process.
How can I tell if my brake pads need replacing?
If the brake pads appear to be worn down to less than a quarter-inch thick, it’s time for a replacement.
Can I visually check my brake fluid level without removing the wheel?
Yes, you can check the brake fluid level through the reservoir under the hood, making it unnecessary to remove the wheel.
What noises might indicate a problem with the brakes?
Squeaking, grinding, or a metallic sound when braking can indicate worn brake pads or other issues that require attention.
How often should I check my brakes if I drive frequently?
It’s advisable to check your brakes at least once a month or before long trips to ensure they are in good condition.